
ESP32-S3 CAM 刷入 MicroPython 摄像头固件、OV3660 拍照排坑及 HTTP MJPEG 局域网视频串流的完整过程。
固件准备与烧录h2
折腾前先准备好工具链:
- 开发板:ESP32-S3 CAM N16R8(8 MB Octal PSRAM)+ OV3660 摄像头
- 烧录工具:esptool
- 代码交互:VS Code 搭配 MicroForge - VS Code ESP 系列开发工具,方便直接连接串口跑脚本和查看异常
这里有个坑:千万别图省事直接刷官方普通的 ESP32_GENERIC_S3 固件,里面没有编译 esp32-camera 驱动和软解模块。直接去 MicroPython Camera API 下载适配好 Freenove 的发布包:
mpy_cam-v1.27.0-FREENOVE_ESP32S3_CAM.zip解压得到 firmware.bin。打开终端,把 COM10 换成你电脑识别到的实际串口,先全盘擦除 Flash 再写入固件:
# 1. 擦除 Flashesptool --chip esp32s3 --port COM10 erase-flash
# 2. 写入固件esptool --chip esp32s3 --port COM10 --baud 460800 write-flash 0x0 firmware.bin
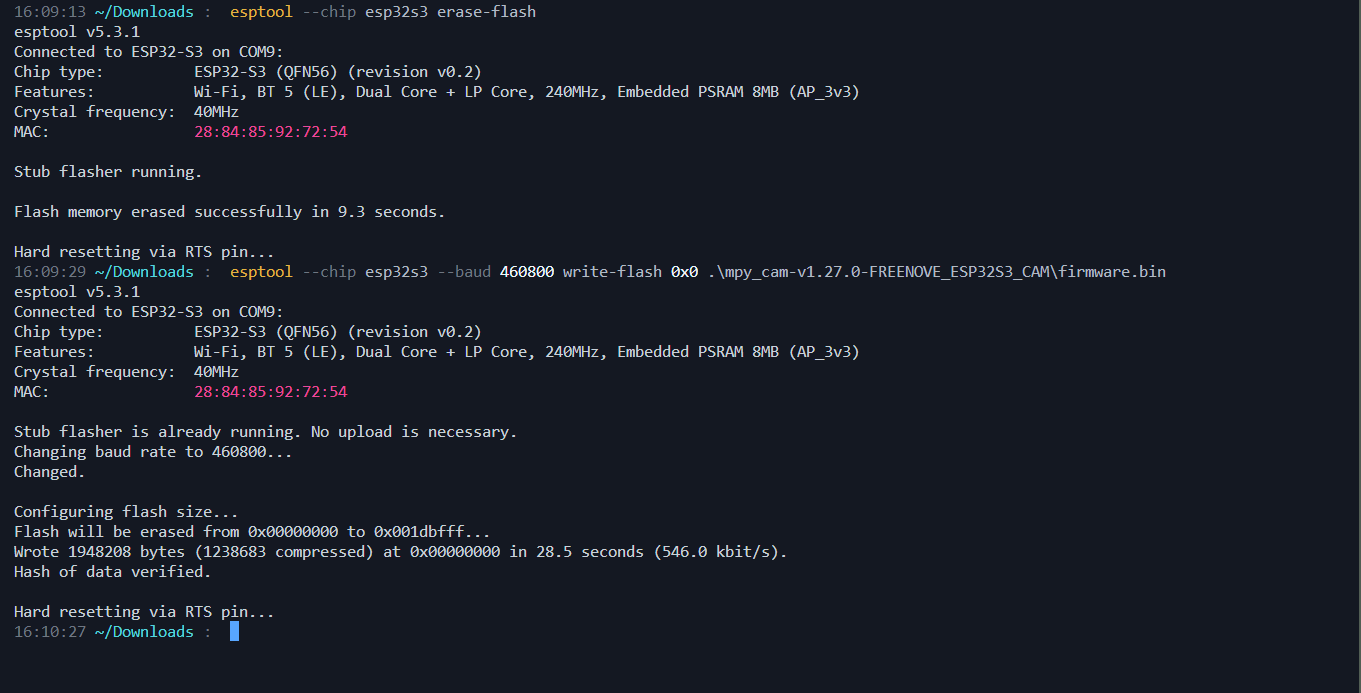
烧录完成打开串口监视器复位开发板,看到类似下面的输出,确认识别出 ESP32-S3 且挂载了 8 MB PSRAM 即说明刷入成功:
引脚配置与拍照验证h2
Freenove ESP32-S3 CAM 的 OV3660 引脚映射如下,代码初始化时需要严格对应:
| 功能 | GPIO |
|---|---|
| D0~D7 | 11, 9, 8, 10, 12, 18, 17, 16 |
| VSYNC | 6 |
| HREF | 7 |
| PCLK | 13 |
| SDA/SIOD | 4 |
| SCL/SIOC | 5 |
| XCLK | 15 |
| PWDN | -1 |
| RESET | -1 |
这颗 OV3660 如果在 MicroPython 中直接开启硬件 JPEG(PixelFormat.JPEG),极易抛出 Failed to capture initial frame 导致初始化崩溃。目前最稳定的方案是让传感器以 PixelFormat.RGB565 输出原始帧,再调用固件内置的 jpeg 模块做软件压缩编码。

将以下测试脚本保存为 camera_test.py,用 MicroForge 上传并运行:
import gcimport jpeg
from camera import Camera, PixelFormat, FrameSize, GrabMode

cam = Camera(    data_pins=[11, 9, 8, 10, 12, 18, 17, 16],    vsync_pin=6,    href_pin=7,    pclk_pin=13,    sda_pin=4,    scl_pin=5,    xclk_pin=15,    xclk_freq=20_000_000,    pixel_format=PixelFormat.RGB565,    frame_size=FrameSize.XGA,       # 1024x768;不稳定时改为 VGA    fb_count=1,    grab_mode=GrabMode.WHEN_EMPTY,)
# OV3660 图像调节;这些属性在 v0.6.2 中可用cam.sharpness = 1cam.denoise = 1cam.contrast = 1cam.saturation = 0cam.brightness = 0cam.exposure_ctrl = Truecam.gain_ctrl = Truecam.whitebal = Truecam.awb_gain = Truecam.aec2 = Truecam.lenc = Truecam.bpc = Truecam.wpc = Truecam.raw_gma = True
# 丢弃启动后的不稳定画面(传感器刚通电需要给自动曝光和白平衡几帧收敛时间)for _ in range(5):    cam.capture()    cam.free_buffer()
width = 512height = 512
raw = cam.capture()try:    encoder = jpeg.Encoder(        width=width,        height=height,        pixel_format="RGB565_BE",        quality=92,        rotation=0,    )    image = encoder.encode(raw)finally:    cam.free_buffer()
with open("/photo.jpg", "wb") as file:    file.write(image)
print("照片保存成功:", len(image), "字节")print("剩余内存:", gc.mem_free())
顺带一提,如果 XGA(1024×768)在抓取时偶发内存不足或丢帧,把分辨率切到 VGA 会轻量许多:
frame_size=FrameSize.VGAwidth = 640height = 480拍摄成像质量受镜头焦距和光照影响明显。这类定焦摄像头出厂通常聚焦在 1~2 米位置,可对准带文字的物体轻微旋动镜头调焦(注意:若镜头螺纹被点胶锁死切勿大力硬拧):
局域网视频串流h2
视频串流走的是经典的 HTTP MJPEG 方案,核心流向清晰明了:
RGB565 原生帧 → jpeg.Encoder 软件压缩 → multipart/x-mixed-replace 响应流 → 浏览器前端分辨率建议首选 VGA(640×480)或 QVGA(320×240)。XGA 分辨率下 ESP32-S3 进行软件 JPEG 压缩负担较重,帧率会直接跌入幻灯片水平。
将以下代码保存为 main.py,填入你家里的 Wi-Fi 信息(ESP32 只支持 2.4 GHz 频段)后上传板子:
import gcimport timeimport networkimport socketimport jpeg
from camera import Camera, PixelFormat, FrameSize, GrabMode

WIFI_SSID = "你的WiFi名称"WIFI_PASSWORD = "你的WiFi密码"
WIDTH = 640HEIGHT = 480JPEG_QUALITY = 88

def send_all(sock, data):    view = memoryview(data)    while len(view):        count = sock.send(view)        if not count:            raise OSError("客户端断开")        view = view[count:]

wlan = network.WLAN(network.STA_IF)wlan.active(True)wlan.connect(WIFI_SSID, WIFI_PASSWORD)
timeout = 20while not wlan.isconnected() and timeout:    time.sleep(1)    timeout -= 1
if not wlan.isconnected():    raise RuntimeError("Wi-Fi 连接失败")
ip = wlan.ifconfig()[0]print("Wi-Fi IP:", ip)
cam = Camera(    data_pins=[11, 9, 8, 10, 12, 18, 17, 16],    vsync_pin=6,    href_pin=7,    pclk_pin=13,    sda_pin=4,    scl_pin=5,    xclk_pin=15,    xclk_freq=20_000_000,    pixel_format=PixelFormat.RGB565,    frame_size=FrameSize.VGA,    fb_count=1,    grab_mode=GrabMode.WHEN_EMPTY,)
cam.sharpness = 1cam.denoise = 1cam.contrast = 1cam.exposure_ctrl = Truecam.gain_ctrl = Truecam.whitebal = Truecam.awb_gain = Truecam.aec2 = Truecam.lenc = Truecam.bpc = Truecam.wpc = Truecam.raw_gma = True
encoder = jpeg.Encoder(    width=WIDTH,    height=HEIGHT,    pixel_format="RGB565_BE",    quality=JPEG_QUALITY,    rotation=0,)
for _ in range(5):    cam.capture()    cam.free_buffer()
server = socket.socket()try:    server.setsockopt(socket.SOL_SOCKET, socket.SO_REUSEADDR, 1)except Exception:    passserver.bind(("0.0.0.0", 80))server.listen(1)
html = (    "HTTP/1.1 200 OK\r\n"    "Content-Type: text/html; charset=utf-8\r\n"    "Connection: close\r\n\r\n"    "<html><body style='margin:0;background:#111;text-align:center'>"    "<img src='/stream' style='max-width:100%;height:auto'>"    "</body></html>").encode()
print("浏览器访问: http://%s/" % ip)
while True:    client = None    try:        client, address = server.accept()        request = client.recv(1024)
        if b"GET /stream " not in request:            send_all(client, html)        else:            send_all(client,                b"HTTP/1.1 200 OK\r\n"                b"Content-Type: multipart/x-mixed-replace; boundary=frame\r\n"                b"Cache-Control: no-cache\r\n"                b"Connection: close\r\n\r\n")
            while True:                raw = cam.capture()                try:                    image = encoder.encode(raw)                finally:                    cam.free_buffer()
                header = ("--frame\r\n"                          "Content-Type: image/jpeg\r\n"                          "Content-Length: %d\r\n\r\n" % len(image)).encode()                send_all(client, header)                send_all(client, image)                send_all(client, b"\r\n")                del image                gc.collect()
    except OSError as error:        print("客户端断开:", error)    except Exception as error:        print("串流错误:", error)    finally:        if client:            try:                client.close()            except Exception:                pass

在同一局域网下的电脑或手机浏览器输入终端打印的 http://[设备IP]/,就能看到低延迟的实时监控画面:
避坑指南与排错调优h2
调试过程中遇到的几个常见问题与解决思路:
- 抓帧失败
Failed to capture initial frame:仔细核对 GPIO 引脚映射与 XCLK 时钟。推荐将xclk_freq固定在20_000_000,抓帧模式设为GrabMode.WHEN_EMPTY,帧缓冲数量fb_count=1。排查时先换用 VGA 或 QVGA 分辨率定位是否为传感器供电或带宽问题。 - 格式报错
Format RGB565 not supported:调用内置jpeg.Encoder时,像素格式必须显式传大端序"RGB565_BE",不要写成"RGB565",否则编码器会因为不认识格式直接报错。 - 属性报错
Camera object has no attribute 'aec':固件集成的 camera 库在 v0.6.2 版本对曝光控制属性做了重构,旧教程里的cam.aec、cam.agc和cam.awb已变更为:cam.exposure_ctrl = Truecam.gain_ctrl = Truecam.whitebal = True - 画面模糊与调参:QVGA 拉伸到全屏必然有马赛克,优先选用 VGA;
JPEG_QUALITY设在 88~92 之间能在体积和细节间取得平衡;开启sharpness=1与denoise=1可以压制暗部噪点;另外检查镜头出厂膜是否撕掉,并保证使用供电充沛的 5V 接口,供电不足极易引起图像杂波。 - 串流帧率调优策略:如果串流卡顿严重,可按阶梯降载:先将分辨率由 XGA 降为 VGA;再将
JPEG_QUALITY从 88 降到 75~80;若网络条件严苛再考虑 QVGA。全程务必维持fb_count=1,避免 PSRAM 缓冲和垃圾回收(GC)拖慢主循环。
相关项目参考: