

 ]]>
]]>
 ]]>
]]>
我用的是CF Tunnel, 这里贴一个NGINX Proxy的配置
节点规划表
| 节点 | 网络 | 身份 | 位置 | 备注 |
|---|---|---|---|---|
| k3s-bj-home-master | 192.168.1.10 | 控制节点, NFS服务器 | 北京 | |
| k3s-sh-aliyun-work1 | 192.168.1.10 | work节点 | 上海 | |
| k3s-usa-oracle-work2 | 192.168.1.10 | work节点 | 美国 | |
| k3s-bj-home-work3 | 192.168.1.10 | work节点 | 北京 | |
| k3s-bj-home-work4 | 192.168.1.10 | work节点 | 北京 |
✅ 建议:实际部署中请为每个节点分配不同的 IP 地址以避免冲突。
下载软件包
所有节点执行
mkdir -p /opt/k3s && cd /opt/k3s

curl https://get.k3s.io  -SsL > install.sh
wget https://github.com/k3s-io/k3s/releases/download/v1.29.15%2Bk3s1/k3s
wget https://github.com/k3s-io/k3s/releases/download/v1.29.15%2Bk3s1/k3s-airgap-images-amd64.tar

mkdir -p /var/lib/rancher/k3s/agent/images/
chmod +x k3s
chmod +x install.sh
cp -a k3s-airgap-images-*  /var/lib/rancher/k3s/agent/images/
cp -a k3s /usr/local/bin/

# 卸载脚本(可选)
# /usr/local/bin/k3s-uninstall.sh
# /usr/local/bin/k3s-agent-uninstall.sh
📌 说明:
- 使用
proxychains是为了在代理环境下下载资源。- 安装完成后记得验证
/usr/local/bin/k3s的权限是否正确。- 如果是离线环境,请确保提前准备好安装包。
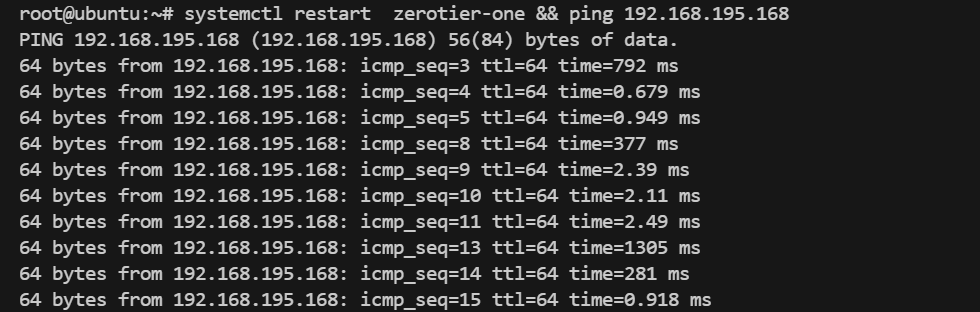
异地组网
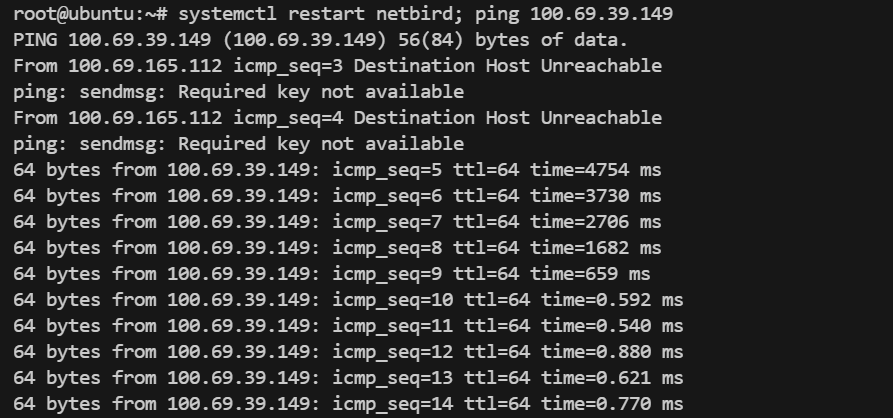
异地组网的方案很多,比如 ZeroTier、Tailscale、Netbird 等等。这里我们选择 Netbird,因为它简单易用且支持多种平台。
安装 Netbird
# 安装文档 https://docs.netbird.io/how-to/getting-started#installation
curl -fsSL https://pkgs.netbird.io/install.sh | sh
📌 注意:如果你使用的是非 Ubuntu 系统,请参考官方文档进行适配安装。
启动并配置 Netbird
netbird up --setup-key xxxxxxxxxxxxx
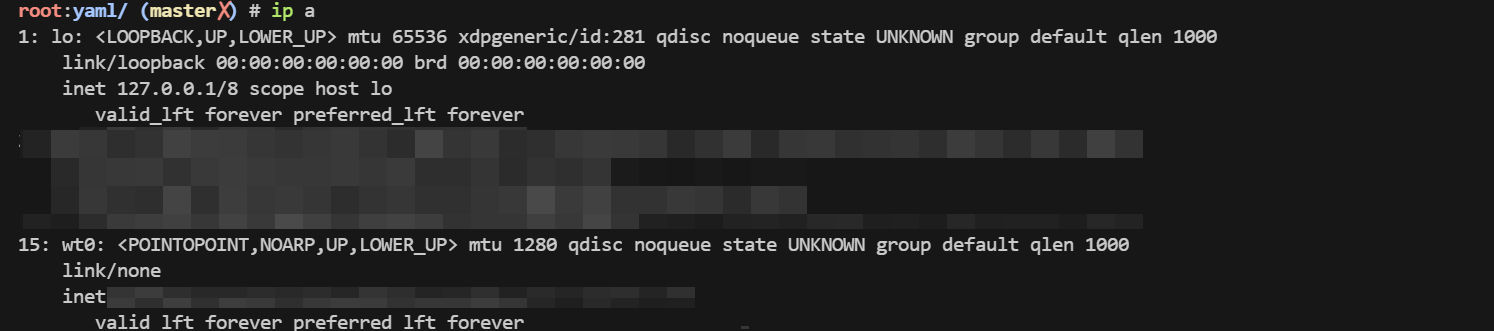
# 正常完成, 会有一个es0的网卡, 我们的异地k3s就用这个网卡通讯
📌 说明:
--auth-key是你从 netbird 控制台获取的密钥。- 成功连接后会生成一个
es0网卡,用于节点间的通信。
系统优化
参数优化
cat > /etc/sysctl.d/99-k3s.conf <<EOF
# 启用桥接流量处理
net.bridge.bridge-nf-call-iptables = 1
net.bridge.bridge-nf-call-ip6tables = 1

# 允许更多连接
net.core.somaxconn = 65535
net.ipv4.ip_forward = 1
net.ipv4.tcp_tw_reuse = 1
net.ipv4.tcp_fin_timeout = 30

# 文件句柄数
fs.file-max = 1000000
fs.inotify.max_user_watches = 524288

# 避免 OOM killer 杀掉关键进程
vm.swappiness = 10


net.ipv4.tcp_keepalive_time = 30  # 降低保活时间,快速检测断连
net.ipv4.tcp_keepalive_intvl = 10
net.ipv4.tcp_keepalive_probes = 3
net.ipv4.tcp_retries2 = 5  # 减少重试次数,适应高延迟
net.ipv4.tcp_syn_retries = 3
net.core.somaxconn = 1024  # 增加连接队列
net.ipv4.ip_forward = 1  # 启用转发(ZeroTier需要)
vm.overcommit_memory = 1  # 允许内存过分配
EOF


sysctl -p /etc/sysctl.d/99-k3s.conf

cat > /etc/security/limits.conf <<EOF
* soft nofile 65536
* hard nofile 65536
* soft nproc 65536
* hard nproc 65536
root soft nofile 65536
root hard nofile 65536

EOF
ipvs
apt-get update && apt-get install -y ipset ipvsadm conntrack

cat > /etc/modules-load.d/ipvs.conf <<EOF
ip_vs
ip_vs_rr
ip_vs_wrr
ip_vs_sh
nf_conntrack
EOF
modprobe ip_vs
modprobe ip_vs_rr
modprobe ip_vs_wrr
modprobe ip_vs_sh
modprobe nf_conntrack

lsmod | grep ip_vs
MASTER节点安装
EASYTIER_ETH=es0
EASYTIER_IP=$(ip a  | grep $EASYTIER_ETH | grep -Eo "([0-9]{1,3}\.){3}[0-9]{1,3}"| head -n 1 )

# INSTALL_K3S_DEBUG=true INSTALL_K3S_SKIP_DOWNLOAD=true INSTALL_K3S_EXEC="--disable traefik --node-ip $EASYTIER_IP --flannel-iface $EASYTIER_ETH --flannel-backend=vxlan" ./install.sh

INSTALL_K3S_DEBUG=true INSTALL_K3S_SKIP_DOWNLOAD=true  INSTALL_K3S_EXEC=" \
  server \
  --flannel-iface=${EASYTIER_ETH} \
  --node-external-ip=${EASYTIER_IP} \
  --node-ip=${EASYTIER_IP} \
  --bind-address=${EASYTIER_IP} \
  --advertise-address=${EASYTIER_IP} \
  --tls-san=${EASYTIER_IP} \
  --data-dir=/var/lib/rancher/k3s \
  --disable=traefik,servicelb \
  --cluster-cidr=10.42.0.0/16 \
  --service-cidr=10.43.0.0/16 \
  --disable-network-policy \
  --write-kubeconfig-mode=644 \
  --kube-proxy-arg=proxy-mode=ipvs \
  --kube-proxy-arg=ipvs-scheduler=rr \
" ./install.sh
获取 node-token
cat /var/lib/rancher/k3s/server/node-token
K106521xxxxxxxxxxxxxxxxxxxxxxxxxxxx::server:e47b4ef911d727671a79cdb6469682b1

WORK节点安装
EASYTIER_ETH=es0
EASYTIER_IP=$(ip a  | grep $EASYTIER_ETH | grep -Eo "([0-9]{1,3}\.){3}[0-9]{1,3}"| head -n 1 )

K3S_TOKEN="K10111631cd06c9e2b19cd3c6477cb74aa5fda54473bb19fbf7b1356e0ac78659f4::server:0319830013db1e32beced4c05aae8098"

# INSTALL_K3S_SKIP_DOWNLOAD=true INSTALL_K3S_EXEC="--node-ip $EASYTIER_IP --flannel-iface $EASYTIER_ETH" K3S_URL=https://k3s-apiserver.internal.xyz:6443 K3S_TOKEN=$K3S_TOKEN ./install.sh

INSTALL_K3S_SKIP_DOWNLOAD=true INSTALL_K3S_EXEC="--node-external-ip=$EASYTIER_IP  \
--node-ip=$EASYTIER_IP     \
--flannel-iface=${EASYTIER_ETH} \
--kube-proxy-arg=proxy-mode=ipvs \
--kube-proxy-arg=ipvs-scheduler=rr" \
K3S_URL=https://k3s-apiserver.internal.0197011.xyz:6443 K3S_TOKEN=$K3S_TOKEN ./install.sh
📌 参数说明:
K3S_URL:指向 master 节点的 API Server 地址,我这里内部使用了k3s-apiserver.internal.xyz:6443这是本地解析的一个域名K3S_TOKEN:master 节点提供的 token。
修改工作节点标签(可选)
kubectl get node --selector='!node-role.kubernetes.io/master' | grep '<none>' | awk '{print "kubectl label node " $1 " node-role.kubernetes.io/worker= --overwrite" }' | bash
✅ 建议:该步骤可以自动为未标记的节点添加
worker标签。
下载 Helm
wget https://get.helm.sh/helm-v3.18.2-linux-amd64.tar.gz
tar -xf helm-v3.18.2-linux-amd64.tar.gz
mv linux-amd64/helm /usr/local/bin/
chmod +x /usr/local/bin/helm
✅ 建议:Helm 是 Kubernetes 的包管理工具,推荐在生产环境中使用。
部署 Ingress
helm repo add ingress-nginx https://kubernetes.github.io/ingress-nginx
helm repo update
helm search repo ingress-nginx
helm pull ingress-nginx/ingress-nginx --untar --version 4.12.3
cd ingress-nginx/

# 可选:修改为国内镜像源
# cp -a values.yaml values.yaml_bak
# sed -i 's/registry: registry.k8s.io/registry: k8s.m.daocloud.io/g'  values.yaml

helm upgrade --install ingress-nginx ./ --set controller.service.type=NodePort --namespace kube-system --create-namespace
✅ 建议:部署完成后请检查服务状态,确保 Ingress Controller 正常运行。
kubectl get pods -n kube-system
配置 HAProxy 作为四层代理
apt install haproxy -y
vim haproxy.cfg
global
  log 127.0.0.1 local0
  log 127.0.0.1 local1 notice
  tune.ssl.default-dh-param 2048

defaults
  log global
  mode http
  option dontlognull
  timeout connect 5000ms
  timeout client 600000ms
  timeout server 600000ms

backend ingress-http
    mode tcp
    balance roundrobin
    stick-table type ip size 200k expire 30m
    stick on src
    server ingress-http 127.0.0.1:31041 check

frontend ingress_http_80
    mode tcp
    bind *:80
    default_backend ingress-http

backend ingress-https
    mode tcp
    balance roundrobin
    stick-table type ip size 200k expire 30m
    stick on src
    server ingress-https 127.0.0.1:32475 check

frontend ingress_https_443
    mode tcp
    bind *:443
    default_backend ingress-https
systemctl enable haproxy --now
systemctl restart haproxy
✅ 建议:根据实际负载情况调整超时时间和负载均衡策略。
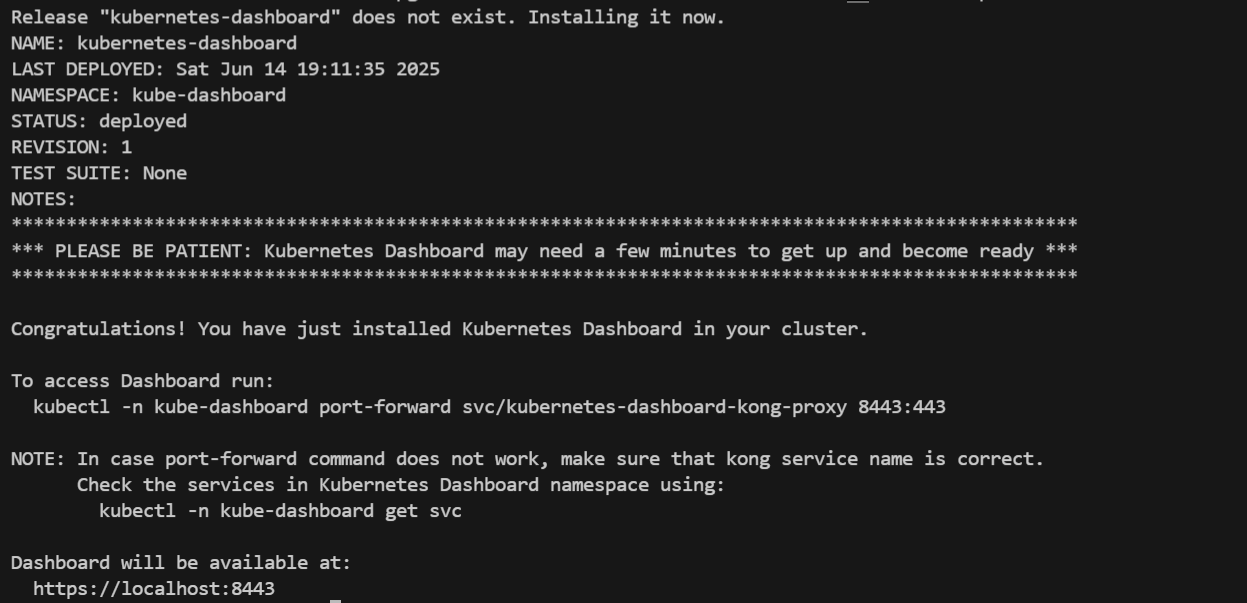
部署 Dashboard
helm repo add kubernetes-dashboard https://kubernetes.github.io/dashboard/
helm search repo kubernetes-dashboard
helm pull kubernetes-dashboard/kubernetes-dashboard --untar --version 7.13.0

# 调整一些配置
cd kubernetes-dashboard
sed -i 's/docker.io/docker.m.daocloud.io/g' values.yaml
# dashboard自带了一个 Kong,也需要调整一下国内源
cd charts/kong
sed -i 's#repository: kong#repository: docker.m.daocloud.io/library/kong#g' values.yaml

helm upgrade --install kubernetes-dashboard ./ --namespace kube-dashboard --create-namespace
配置 Ingress 访问
# kubectl create secret tls       domain-cn-tls   --key  /etc/ssl/domain.cn.key        --cert /etc/ssl/domain.cn.pem -n  kube-dashboard

kubectl apply -f - <<EOF
apiVersion: networking.k8s.io/v1
kind: Ingress
metadata:
  annotations:
    nginx.ingress.kubernetes.io/backend-protocol: HTTPS
  name: dashboard-ingress
  namespace: kube-dashboard
spec:
  ingressClassName: nginx
  rules:
  - host: dh.domain.com
    http:
      paths:
      - backend:
          service:
            name: kubernetes-dashboard-kong-proxy
            port:
              number: 443
        path: /
        pathType: Prefix
  tls:
  - hosts:
    - dh.domain.com
    secretName: domain-cn-tls
EOF
创建访问 Token
kubectl apply -f - <<EOF
apiVersion: v1
kind: ServiceAccount
metadata:
  name: admin-user
  namespace: kube-dashboard
---
apiVersion: rbac.authorization.k8s.io/v1
kind: ClusterRoleBinding
metadata:
  name: admin-user
roleRef:
  apiGroup: rbac.authorization.k8s.io
  kind: ClusterRole
  name: cluster-admin
subjects:
- kind: ServiceAccount
  name: admin-user
  namespace: kube-dashboard
EOF

# 生成有效期为 10 年的 Token
kubectl create token admin-user -n kube-dashboard --duration 87600h
配置 NFS 网络存储
NFS Server 搭建
apt install nfs-kernel-server -y

vim /etc/exports
/mnt/m2disk  *(rw,sync,no_subtree_check,no_root_squash)

systemctl enable nfs-kernel-server --now
systemctl restart nfs-kernel-server
所有节点安装 NFS 客户端
apt update && apt install -y nfs-common
# sudo yum install -y nfs-utils
NFS Provisoner 配置
helm repo add nfs-subdir-external-provisioner https://kubernetes-sigs.github.io/nfs-subdir-external-provisioner/
helm search repo nfs-subdir-external-provisioner
helm pull nfs-subdir-external-provisioner/nfs-subdir-external-provisioner --untar --version 4.0.18

# 调整一些配置
cd nfs-subdir-external-provisioner
sed -i 's/registry.k8s.io/k8s.m.daocloud.io/g' values.yaml
vim values.yaml

helm upgrade --install nfs-subdir-external-provisioner ./ --namespace kube-system --create-namespace
✅ 建议:确保 NFS 共享目录权限设置合理,避免权限问题导致挂载失败。
异地优化
使用命名空间划分资源区域
目标是:
- 需要运行在 home 环境下的服务,创建在
ser-home命名空间下。 - 需要运行在 aliyun 环境下的服务,创建在
ser-aliyun命名空间下。
开启 PodNodeSelector 准入控制器
# 划分资源的ns
kubectl create ns ser-usa
kubectl create ns ser-home
kubectl create ns ser-aliyun


mkdir -p /etc/rancher/k3s/config.yaml.d
cat > apiserver.yaml <<EOF
kube-apiserver-arg:
  - "--enable-admission-plugins=PodNodeSelector"
EOF

systemctl restart k3s
给节点打标签
kubectl label nodes k3s-bj-home-xxx location=home
kubectl label nodes k3s-usa-oracle-xxx location=usa
kubectl label nodes k3s-sh-aliyun-xxx location=aliyun
配置命名空间注解
# 配置命名空间注解
kubectl edit ns ser-aliyun

apiVersion: v1
kind: Namespace
metadata:
  annotations:
    scheduler.alpha.kubernetes.io/node-selector: location=aliyun
  labels:
    kubernetes.io/metadata.name: ser-aliyun
  name: ser-aliyun
测试调度
# 测试调度
kubectl -n ser-aliyun run test-pod-$RANDOM --image=m.daocloud.io/docker.io/library/nginx --restart=Never
kubectl -n ser-aliyun run test-pod$RANDOM --image=m.daocloud.io/docker.io/library/nginx --restart=Never
🔍 注意:如果你在 Deployment 上额外指定了
nodeSelector和scheduler.alpha.kubernetes.io/node-selector,后者的优先级更高。
补充
k3s 使用Docker
# 网络插件
mkdir /opt/cni/bin -p
wget https://github.com/flannel-io/cni-plugin/releases/download/v1.7.1-flannel1/flannel-amd64
mv flannel-amd64 /opt/cni/bin/flannel

curl -L https://github.com/containernetworking/plugins/releases/download/v1.7.1/cni-plugins-linux-amd64-v1.7.1.tgz | tar -C /opt/cni/bin -xz


mkdir -p /etc/cni/net.d
cat > /etc/cni/net.d/10-flannel.conflist <<EOF
{
  "name": "cbr0",
  "cniVersion": "0.4.0",
  "plugins": [
    {
      "type": "flannel",
      "delegate": {
        "hairpinMode": true,
        "isDefaultGateway": true
      }
    },
    {
      "type": "portmap",
      "capabilities": {
        "portMappings": true
      }
    }
  ]
}
EOF
# cri-dockerd
wget https://github.com/Mirantis/cri-dockerd/releases/download/v0.3.16/cri-dockerd-0.3.16.amd64.tgz
tar -xf cri-dockerd-0.3.16.amd64.tgz
mv cri-dockerd/cri-dockerd /usr/local/bin/


wget https://raw.githubusercontent.com/Mirantis/cri-dockerd/master/packaging/systemd/cri-docker.socket
wget  https://raw.githubusercontent.com/Mirantis/cri-dockerd/master/packaging/systemd/cri-docker.service
mv cri-docker.socket cri-docker.service /etc/systemd/system/

sed -i -e 's,/usr/bin/cri-dockerd,/usr/local/bin/cri-dockerd,' /etc/systemd/system/cri-docker.service

systemctl enable cri-docker.service
systemctl enable --now cri-docker.socket
systemctl restart  cri-docker.socket
# 安装命令
INSTALL_K3S_DEBUG=true INSTALL_K3S_SKIP_DOWNLOAD=true INSTALL_K3S_EXEC="\
--container-runtime-endpoint unix:///run/cri-dockerd.sock \
--disable traefik \
--node-ip $EASYTIER_IP \
--flannel-iface $EASYTIER_ETH \
--flannel-backend=vxlan" ./install.sh
相关文档
]]>


 ]]>
]]> ]]>
]]>

 ]]>
]]>