PXE+Kickstart批量装机rocky9

PXE自动装机(rocky9)

什么是PXE自动装机

PXE(预启动执行环境)提供了一种使计算机通过网络启动的机制。当系统通过网络启动时,BIOS使用PXE进行引导,然后加载一个提供于网络上的操作系统映像。

什么是Kickstart

PXE并不能决定该安装哪种操作系统、如何安装以及安装过程中的各种设置如何配置。这就是Kickstart文件的作用。Kickstart文件包含了自动安装中所有的配置,例如安装哪些包、如何分割硬盘等。

未命名绘图

基础环境

注意! 下文中的pxe_server_ip即为pxe_server_ip : )

1
2
systemctl disable firewalld --now
setenforce 0 # 记得配置持久化

ftp 配置

我们使用 FTP 将操作系统安装介质共享到 PXE 引导客户端。

安装 vsftpd 包并确保启用服务:

1
2
yum install vsftpd -y
systemctl enable vsftpd

配置 /etc/vsftpd/vsftpd.conf

1
2
3
4
5
6
7
8
9
10
11
12
13
14
15
16
17
18
19
anonymous_enable=YES
local_enable=NO
write_enable=NO
local_umask=022
dirmessage_enable=YES
xferlog_enable=YES
connect_from_port_20=YES
xferlog_std_format=YES
ftpd_banner=Welcome to homelab FTP service.
listen=YES
listen_ipv6=NO
listen_port=21
pam_service_name=vsftpd
userlist_enable=YES
tcp_wrappers=YES
pasv_enable=YES
pasv_address=pxe_server_ip
pasv_min_port=60000
pasv_max_port=60029
1
systemctl start vsftpd

安装 tftp-server 软件包并确保启用该服务:

1
2
yum install tftp-server -y
systemctl enable tftp && sudo systemctl start tftp

安装介质

下载 Rocky-9.3 ISO 映像。确保下载完整的DVD版本,例如:

1
2
# https://dl.rockylinux.org/pub/rocky/9/isos/x86_64/
Download Rocky-9.3-x86_64-dvd.iso

挂载映像并将其内容复制到 FTP 位置:

1
2
3
4
mkdir -p /mnt/iso /var/ftp/pub/pxe/Rocky-9.3-x86_64
mount Rocky-9.3-x86_64-dvd.iso /mnt/iso
cp -prv /mnt/iso/* /var/ftp/pub/pxe/Rocky-9.3-x86_64/
umount /mnt/iso

验证:

1
2
3
4
5
6
7
8
curl ftp://pxe_server_ip/pub/pxe/Rocky-9.3-x86_64/
drwxr-xr-x 4 0 0 38 Nov 12 08:03 AppStream
drwxrwxr-x 4 0 0 38 Nov 12 22:40 BaseOS
drwxrwxr-x 3 0 0 18 Nov 12 21:32 EFI
-rw-r--r-- 1 0 0 2204 Oct 20 2023 LICENSE
drwxrwxr-x 3 0 0 59 Nov 12 21:32 images
drwxrwxr-x 2 0 0 239 Nov 12 21:32 isolinux
-rw-r--r-- 1 0 0 101 Nov 12 22:33 media.repo

创建 Kickstart 文件

这是我用于我的 Rocky-9.3-x86_64-dvd.iso 服务器(需要 32GB 磁盘)的 kickstart 文件 /var/ftp/pub/pxe/Rocky-9.3-x86_64.cfg

1
2
3
4
5
6
7
8
9
10
11
12
13
14
15
16
17
18
19
20
21
22
23
24
25
26
27
28
29
30
31
32
33
34
35
36
37
38
39
40
41
42
43
44
45
46
47
48
49
50
51
52
53
54
55
56
57
58
59
60
61
62
63
64
65
66
67
68
69
70
71
72
73
74
75
76
77
78
79
80
81
82
83
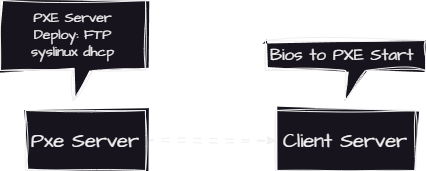
# Use network installation
url --url="ftp://pxe_server_ip/pub/pxe/Rocky-9.3-x86_64/BaseOS/"
repo --name="AppStream" --baseurl="ftp://pxe_server_ip/pub/pxe/Rocky-9.3-x86_64/AppStream/"
# Disable Initial Setup on first boot
firstboot --disable

# Use text mode install
text
# Keyboard layouts
keyboard --vckeymap=gb --xlayouts='gb'
# System language
lang en_GB.UTF-8
# SELinux configuration
selinux --enforcing
# Firewall configuration
firewall --enabled --ssh
# Do not configure the X Window System
skipx

# Network information
# network --bootproto=dhcp --device=ens18 --nameserver=8.8.8.8 --noipv6 --activate
network --bootproto=dhcp --device=ens18 --noipv6 --activate

# System authorisation information
auth --useshadow --passalgo=sha512
# Root password
rootpw lenovo
# Root SSH public key
sshkey --username=root "id_rsa.pub文件内容"
# System timezone
timezone Asia/shanghai --utc

ignoredisk --only-use=sda
# System bootloader configuration
bootloader --location=mbr --timeout=1 --boot-drive=sda
# Clear the Master Boot Record
zerombr
# Partition clearing information
clearpart --all --initlabel
# Reboot after installation
reboot

# Disk partitioning information
#autopart --type=lvm
part /boot --fstype="xfs" --ondisk=sda --size=1024 --label=boot --asprimary --fsoptions="rw,nodev,noexec,nosuid"
part pv.01 --fstype="lvmpv" --ondisk=sda --size=31743
volgroup vg_os pv.01

# 根据需求配置分区
# logvol /home --fstype="xfs" --size=1024 --label="lv_tmp" --name=lv_tmp --vgname=vg_os --fsoptions="rw,nodev,noexec,nosuid"
logvol / --fstype="xfs" --size=31743 --label="lv_root" --name=lv_root --vgname=vg_os

%packages
# dnf group info minimal-environment
@^minimal-environment
sudo
qemu-guest-agent
openssh-server
# Alsa not needed in a VM
-alsa*
# Microcode updates cannot work in a VM
-microcode_ctl
# Firmware packages are not needed in a VM
-iwl*firmware
# Don't build rescue initramfs
-dracut-config-rescue
-plymouth
%end

%addon com_redhat_kdump --disable --reserve-mb='auto'
%end

%post
sed -i 's/^.*requiretty/#Defaults requiretty/' /etc/sudoers
sed -i 's/rhgb //' /etc/default/grub
# SSHD PermitRootLogin and enable the service
sed -i "s/#PermitRootLogin prohibit-password/PermitRootLogin yes/g" /etc/ssh/sshd_config
/usr/bin/systemctl enable sshd
# Update all packages
# /usr/bin/yum -y update

# 其他需要执行的脚本
%end

复制内容并将其另存为 /var/ftp/pub/pxe/Rocky-9.3-x86_64.cfg

安装 Syslinux

Syslinux 项目涵盖了用于网络引导的轻量级引导加载程序 (PXELINUX) 等。

安装 syslinux 软件包:

1
yum install syslinux -y

将 syslinux 引导加载程序复制到 tftp 服务器的引导目录:

1
cp -prv /usr/share/syslinux/* /var/lib/tftpboot/

将 Rocky-9.3-x86_64-dvd.iso 安装介质复制 initrd.imgvmlinuz /var/lib/tftpboot/networkboot/Rocky-9.3-x86_64/

1
2
mkdir -p /var/lib/tftpboot/networkboot/Rocky-9.3-x86_64
cp -pv /var/ftp/pub/pxe/Rocky-9.3-x86_64/images/pxeboot/{initrd.img,vmlinuz} /var/lib/tftpboot/networkboot/Rocky-9.3-x86_64/

创建 PXE 配置目录:

1
mkdir -p /var/lib/tftpboot/pxelinux.cfg

创建 /var/lib/tftpboot/pxelinux.cfg/default 包含以下内容的 PXE 启动配置文件:

1
2
3
4
5
6
7
8
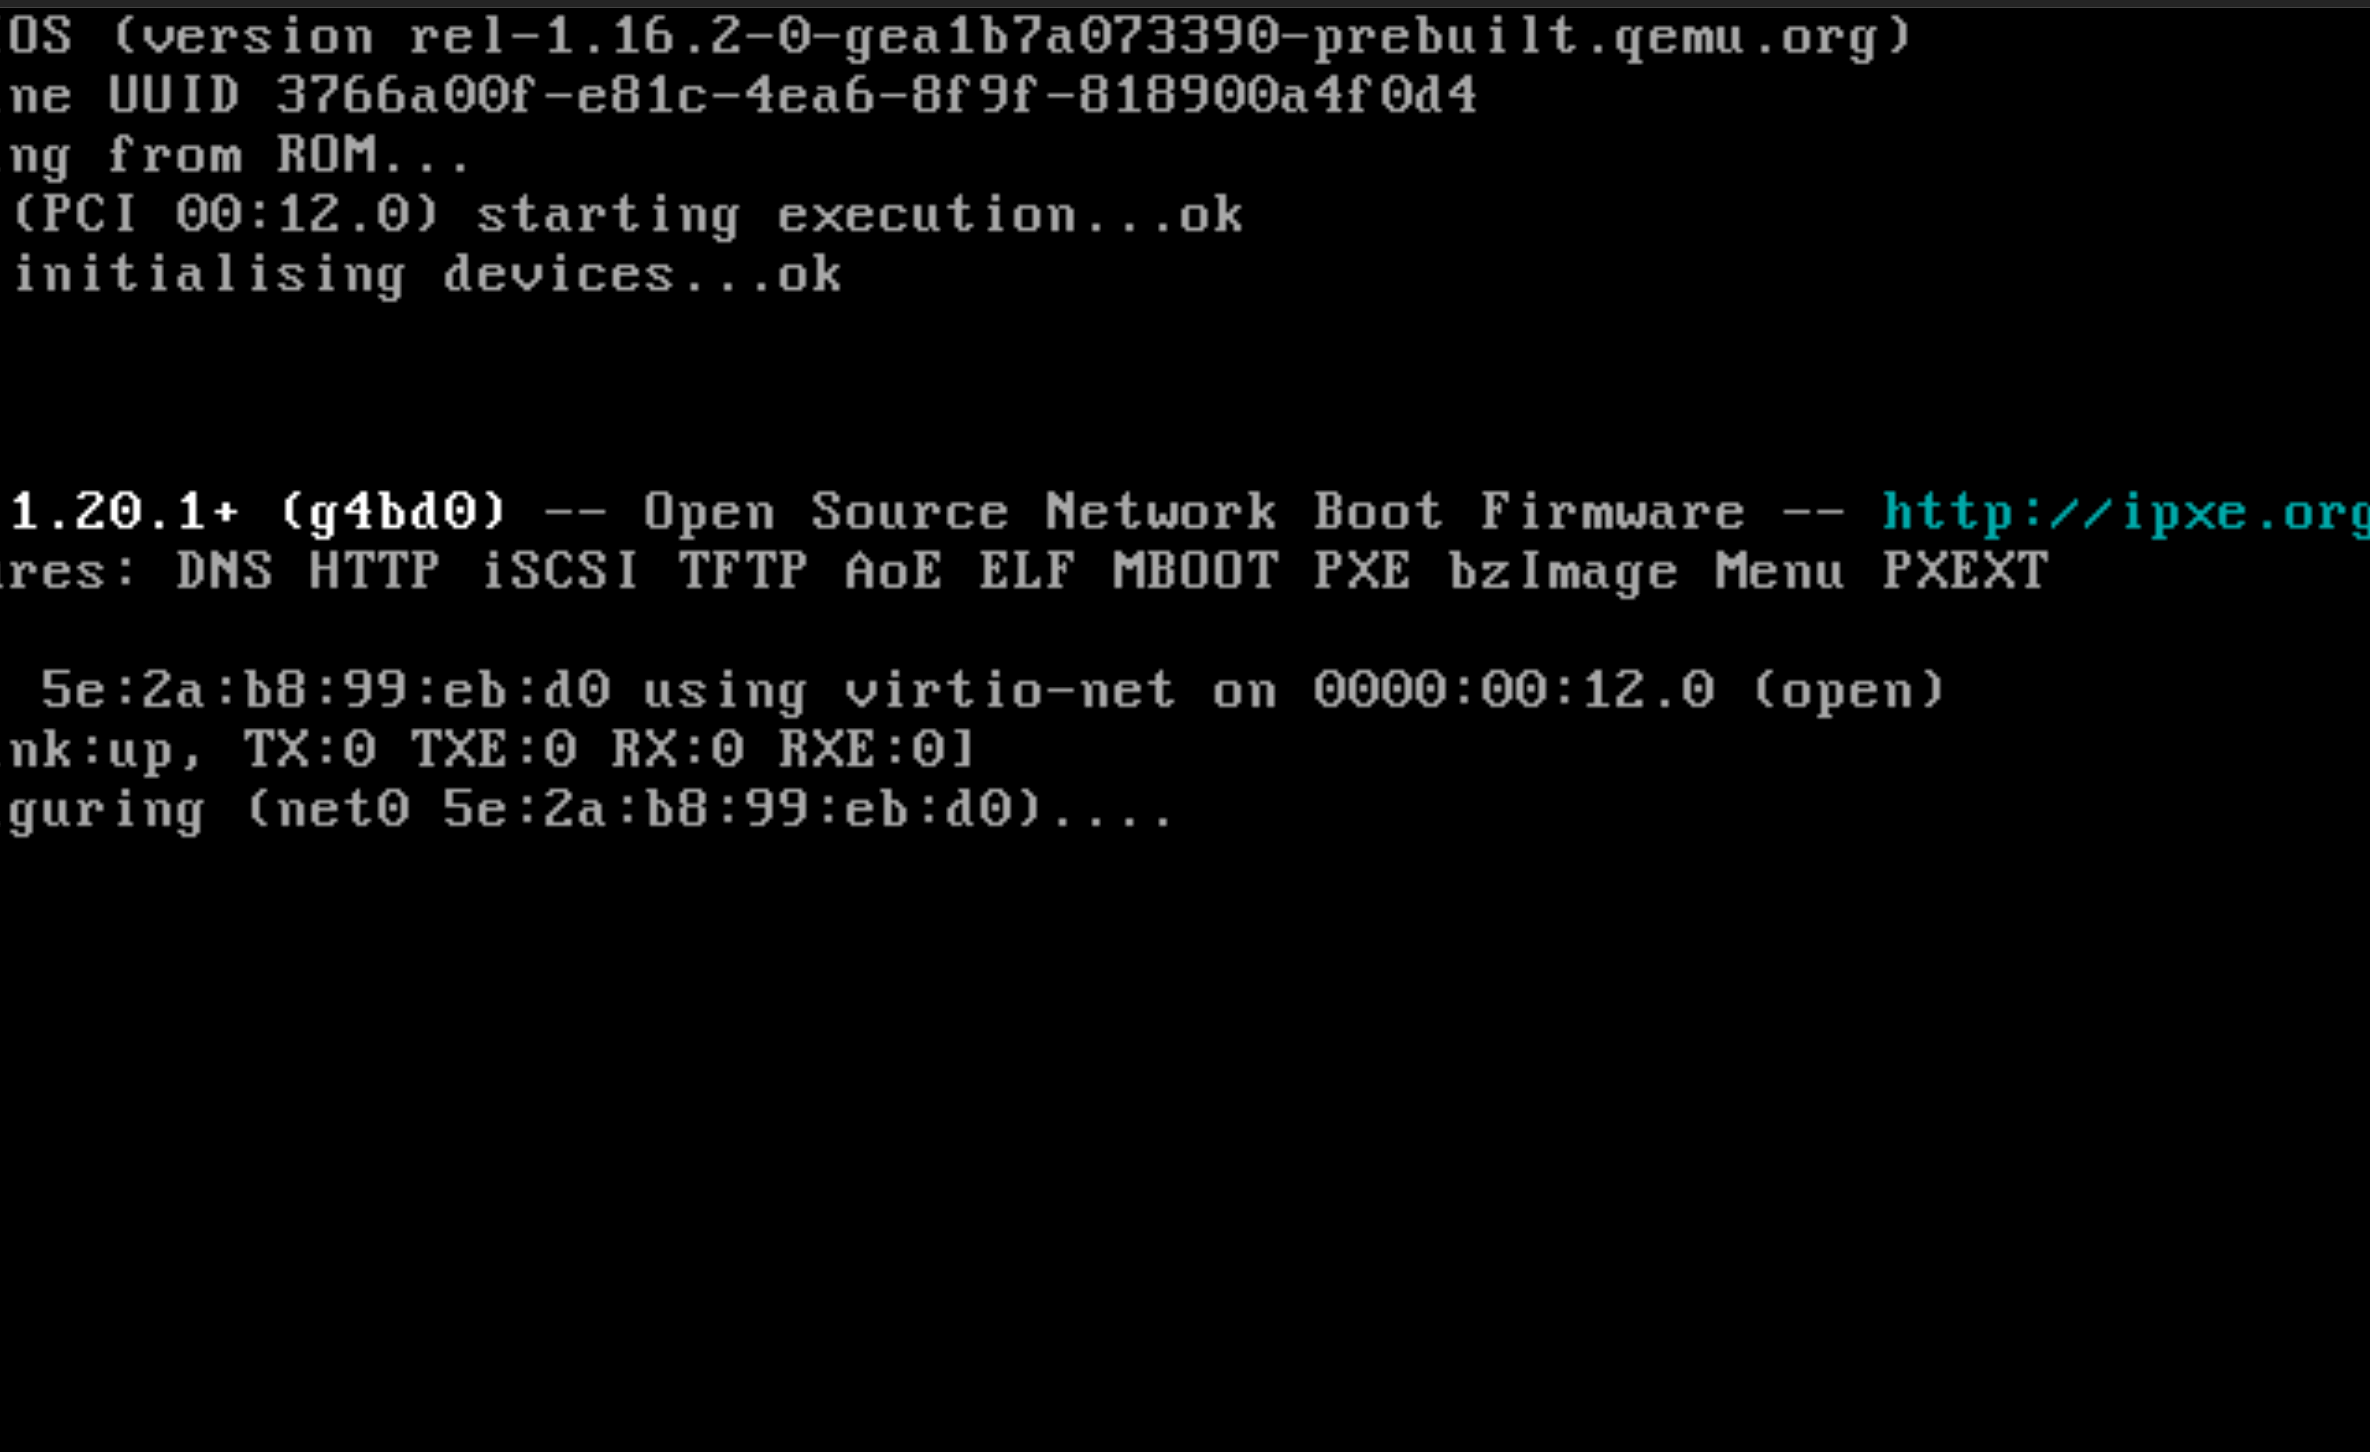
# vim /var/lib/tftpboot/pxelinux.cfg/default
default menu.c32
prompt 0
timeout 50
menu title Homelab PXE Menu
label Install Rocky Linux 9 Server
kernel /networkboot/Rocky-9.3-x86_64/vmlinuz
append initrd=/networkboot/Rocky-9.3-x86_64/initrd.img inst.repo=ftp://pxe_server_ip/pub/pxe/Rocky-9.3-x86_64/ inst.ks=ftp://pxe_server_ip/pub/pxe/Rocky-9.3-x86_64.cfg

dhcp配置

1
yum install dhcpd -y 
1
2
3
4
5
6
7
8
9
10
11
12
13
14
15
16
17
18
19
20
21
22
23
24
25
26
vim /etc/dhcp/dhcpd.conf
ddns-update-style interim;

allow booting;
allow bootp;

ignore client-updates;
set vendorclass = option vendor-class-identifier;

option pxe-system-type code 93 = unsigned integer 16;

subnet 192.168.0.0 netmask 255.255.255.0 {
option routers pxe_server_ip;
option domain-name-servers pxe_server_ip;
option subnet-mask 255.255.255.0;
range dynamic-bootp 192.168.0.150 192.168.0.200;
default-lease-time 21600;
max-lease-time 43200;
next-server pxe_server_ip;
filename "pxelinux.0";

}

# group for Cobbler DHCP tag: default
group {
}

接下来就是用网线, 把pxeserver + server接通然后, 把server从Network启动即可

2024-04-24_22-54-18

作者

默吟

发布于

2024-03-24

更新于

2024-05-15

许可协议

CC BY-NC-SA 4.0

Your browser is out-of-date!

Update your browser to view this website correctly.&npsb;Update my browser now

×